Most home dumbbell setups fail for the same reason. Not budget. Not space. They fail because the person bought one set that does everything poorly instead of two sets that each do one job well.
A home dumbbell setup is a five year decision. Get it right and you stop thinking about it. Get it wrong and every session becomes a negotiation with loose collars, rolling heads, and a handle that spins in your palm at rep eight.
I have coached for 12 years and programmed dumbbell work for 14 year olds and 70 year olds. The equipment is the least interesting part of that job, which is exactly why it needs to be boring. Boring equipment means your attention goes to the rep, not to the tool.
Here is the setup I would build for a client with one wall of a garage, and the order to do it in.
Why you should trust me
I started with a pair of 25s and a bench in a two car garage in Denver. That garage became a 4,000 square foot facility, and along the way I watched a lot of dumbbells die.
The failures are almost always the same three. Knurling that is purely cosmetic and holds nothing once your hands get damp. An adjustable mechanism that jams the first time chalk gets into it. Welds that let the plates shift under load, so the dumbbell clicks through the entire set.
I test the way clients train. Waist high drops onto rubber flooring. Knurling checks with chalked hands at the end of a session, not the start. Farmer carries until grip fails, which tells you more about a handle than any spec sheet. I keep a log of which handles hold chalk and which ones shred skin.
Everything below comes from that log.
How I picked and how I tested
I do not recommend an adjustable dumbbell until it has survived a full 12 week training block and 500 mechanism changes. That is the bar, and it is not negotiable. A dial that feels smooth on a showroom floor can feel like wet sand at change 200 with chalk on your fingers. Change 500 is where the truth shows up.
For fixed dumbbells the checklist is shorter but stricter. Does the head have six sides, so it stays where you set it down instead of rolling into the wall? Is the rubber bonded to the head or sprayed on the outside like paint? Does the handle sit centered, or does the whole bell want to rotate out of your hand?
Two numbers I trust. A weight label that is off by more than two percent is lying to you, and you will feel it when you try to load evenly. Knurling that is too shallow will not hold chalk. Knurling that is too aggressive will take your calluses off in week three. The right knurl is the one you forget about at rep eight.
Dumbbells you'll need before you start
You cannot program around bad equipment. Pick the two sets first, then build the training around them. One adjustable set for the range, one fixed pair for everything you do every single week.
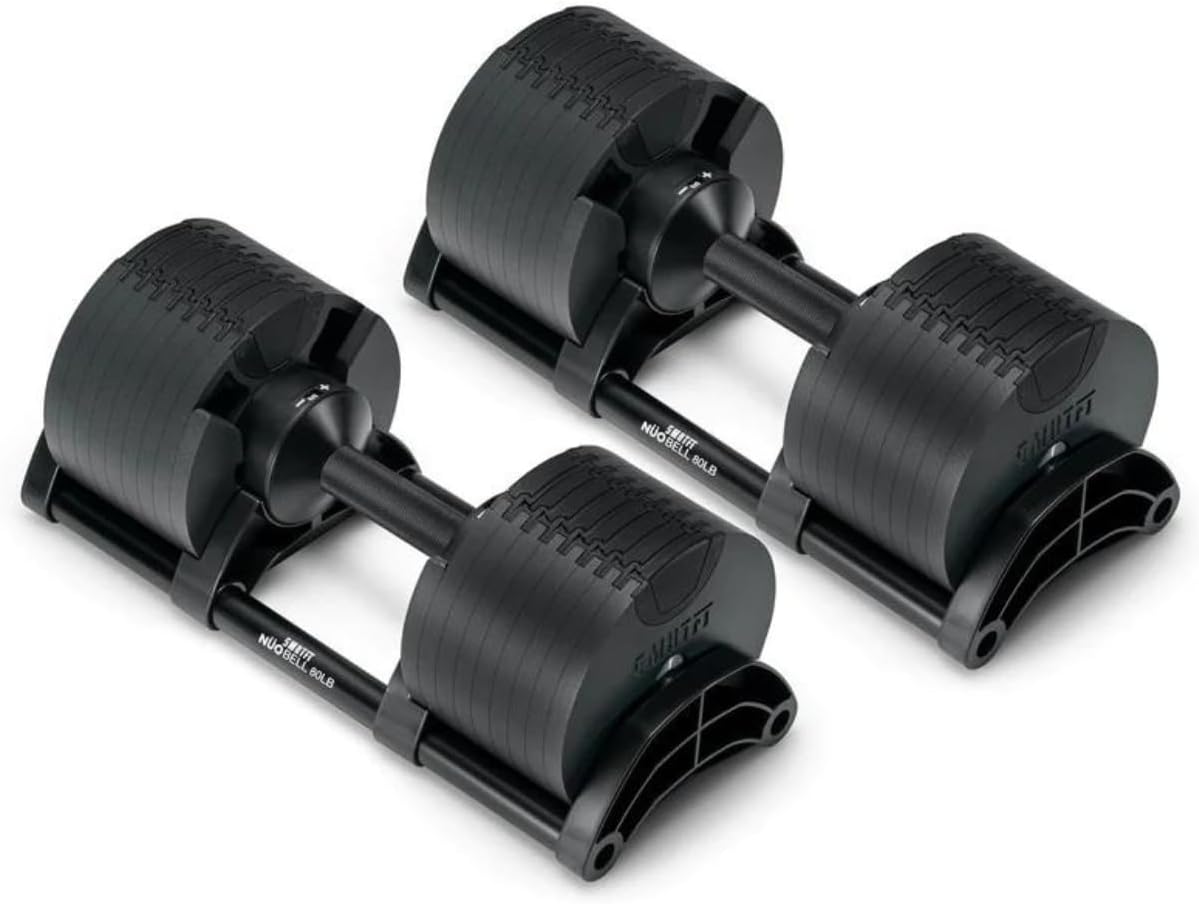
The adjustable centerpiece: SMRTFT NUOBELL Adjustable Dumbbells 5-80 lb Set | Original NUOBELL
 Visit on Amazon →
This is the set I point serious lifters toward when they ask for an adjustable that does not feel like a gadget. The range runs from 5 to 80 pounds, which is enough headroom that most people never outgrow it. A 35 pound press and a 70 pound row live in the same pair of handles, and that matters more than any spec sheet, because one purchase covers your warm up and your working sets.
What I care about is the mechanism, not the number on the box. A quick change design has to survive chalk, sweat, and being set down hard a thousand times. When you evaluate one of these, do it with dirty hands. Change the weight fifty times in a row, faster than is reasonable, and see whether it still seats cleanly. That is the only review that counts.
The other thing to check is plate seating. Load it, hold it at your side, and shake it. If the plates rattle, the mechanism is not locking tight, and a rattling dumbbell teaches you to move slowly for the wrong reason.
Flaws but not dealbreakers: The footprint. A set that covers 5 to 80 takes up real floor space, so plan a spot for it before it arrives.
Anyone who trains three or more days a week and wants one set to carry the whole program should start here.
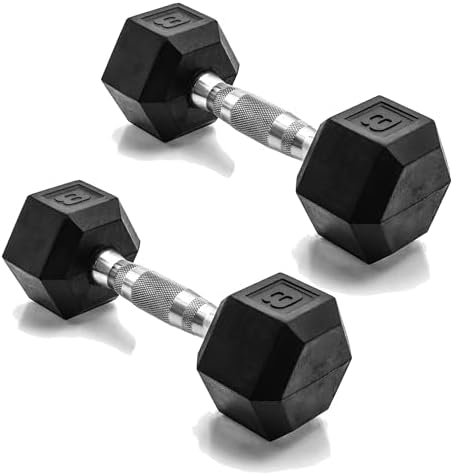
The fixed set workhorse: CAP Rubber Coated Dumbbell Weights, Free Weights for Home Gym Strength Training, Anti-Roll Hex Dumbbells with Black, Chrome & Comfort Grip Handles, Pairs & Sets
 Visit on Amazon →
Every home gym needs one pair of fixed dumbbells that never leaves the floor. Something you grab for curls, lateral raises, and the warm up sets you do while your coffee is still working. This is that pair.
The hex head is the reason. Round heads roll. A round dumbbell rolls off a bench, off a rack, and into your shin. A six sided head stays exactly where you put it, which is why hex rubber became the home gym standard in the first place. The rubber coating protects your floor and, more importantly, keeps the noise down when you set the weight down between sets in a garage at 6 in the morning with neighbors on the other side of the wall.
Chrome handles with a comfort grip are the right call for a fixed set. You are not chasing a competition knurl here. You want something you can pick up for high rep lateral raises without shredding your hands, and something that will not rust out in a humid garage.
It comes as pairs and as sets, which lets you buy the two or three pairs you actually use instead of a full rack you will never touch.
Flaws but not dealbreakers: Rubber coating on any fixed dumbbell needs a little care. Do not store it on bare concrete in a damp basement and expect it to look new in five years.
Anyone building out a garage or a spare room should own at least one pair of these before they buy anything else.
The actual setup workflow
Now the part you came for. This is the order I set up every home gym I touch, and it works in a garage, a basement, or the corner of a living room.
Step one: Floor first. Rubber mats, at least half an inch thick, under the whole working area. Not because the dumbbells need it. Because your knees, your wrists, and your downstairs neighbors need it. A dropped 80 pound dumbbell on bare concrete cracks the slab and scares the dog. On a mat it lands and stays.
Step two: Decide where the adjustable set lives. This is the one piece of equipment with a permanent home, because it has a tray or a stand. Put it where you actually train, not where it looks tidy. If you have to walk to another room to change weights, you will stop changing weights, and the set becomes a very expensive pair of 25s.
Step three: Set the fixed pair where you use it most. Mine live next to the bench, because that is where curls and raises happen. If you do a lot of floor work, they live on the floor. Proximity beats storage every time.
Step four: Test the seating before your first session. Load the adjustable, hold it at your side, and shake it. Set the fixed pair down and see whether it stays put. Do this before you are tired and distracted, because this is when you catch a problem.
Step five: Chalk protocol. If you use chalk, use it sparingly and keep it off the mechanism. Chalk is for your hands. A chalky hand on a chrome handle is fine. Chalk dust inside a dial is how a good mechanism becomes a jammed one.
Step six: Recheck every few weeks. A dumbbell that was tight in January can loosen by March if the plates are not seated the same way each time. Ten seconds of shaking a loaded dumbbell once a month is the entire maintenance schedule.
Step seven: Program for the equipment you own. The adjustable set is for your main lifts: presses, rows, split squats, Romanian deadlifts. The fixed pair is for accessory work and warm ups. Write the program that way and you will never waste a set walking back and forth across the room.
The competition and why it lost
There are three other paths and all of them are legitimate, just not for this article.
Spinlock dumbbells with threaded collars are cheap and adjustable, but the collars loosen mid set and the plates clang. I have never met a client who kept them past a year.
Selectorized dial adjustables from the big names are proven, and one of them is the default recommendation for people who just want a set in the corner and a smooth dial. That mechanism is the most reliable thing in the category. If footprint and dial feel are your priorities, that is the conversation to have.
Block style adjustables are bombproof and space efficient, but the cage feel is not for everyone. Some lifters love it. Some never get used to it.
Rubber hex fixed sets from the premium makers are the gold standard for a real gym. Expensive, heavy to ship, and they will outlive you. If you have the budget and the floor space for a full rack, buy the rack.
Today is the two set home setup. That is a different problem.
What this all costs
I am not going to quote prices, because they move and because the number that matters is not today's number. Check current Amazon price on both sets and do the math on cost per session instead.
If you train three days a week, that is roughly 150 sessions a year. Run any dumbbell purchase across five years and divide. A set that lasts is cheap. A set that rattles, jams, or rolls away is expensive no matter what you paid, because you replace it, and then you replace it again.
The other cost nobody budgets for is the second purchase. Most people buy one set, discover it does not cover everything, and buy again within eighteen months. Buying the adjustable and the fixed pair at the same time is the cheaper path, even if it stings on day one.
The short version
Pick two sets. One adjustable with enough range to cover your main lifts for a decade, and one fixed hex pair you grab without thinking. Put them where you train. Test the seating before you trust them. Keep chalk out of the mechanism. Then stop shopping and start training.
The dumbbell is the tool. The rep quality is the workout.